You’re sweeping your metal detector across a field that’s been hunted for decades. You feel confident, thorough. What you don’t realize? You just walked right over a silver dollar buried 10 inches deep. Your detector stayed completely silent.
Here’s the frustrating truth about metal detector depth: when you double a target’s depth, the signal strength drops to roughly 1/64th of its original power. That’s not a marketing gimmick or a broken detector. It’s just physics doing its thing.
I learned this lesson the hard way during my second year of treasure hunting. My buddy Marcus and I were working an old park when he suddenly pulled a gorgeous 1916 Mercury dime from what had to be 10+ inches down. The crazy part? I’d swept that exact spot three times with my entry-level machine and heard absolutely nothing. The dime was sitting right there, and my detector acted like the ground was completely empty.
That day fundamentally changed how I approach this hobby. It taught me that understanding why deep targets are so challenging matters way more than how much your equipment costs.
- Understanding Metal Detector Depth: The Physics Behind Deep Target Detection (Don't Worry, I'll Keep This Simple)
- Metal Detector Depth Range Factors: What Those "Maximum Depth" Claims Actually Mean
- Ground Balancing for Maximum Depth: The Foundation Everything Else Builds On
- Detector Frequency for Deep Detection: Why Low Frequency Metal Detectors Go Deeper
- Search Coils and Coil Size for Depth: Large Coil vs Small Coil Depth Comparison
- Field Techniques for Detecting Targets at Maximum Depth
- Deep Target Signal Identification: What to Actually Listen For
- Site Selection for Detecting Deep Relics and Artifacts: Research Beats Equipment Every Time
- Soil Conditions and Detection Depth: Tips for Finding Deep Buried Treasure
- Increasing Metal Detector Depth: Common Questions About Deep Target Detection
- Best Settings for Deep Metal Detecting: The Bottom Line on Deep Target Detection
Understanding Metal Detector Depth: The Physics Behind Deep Target Detection (Don’t Worry, I’ll Keep This Simple)
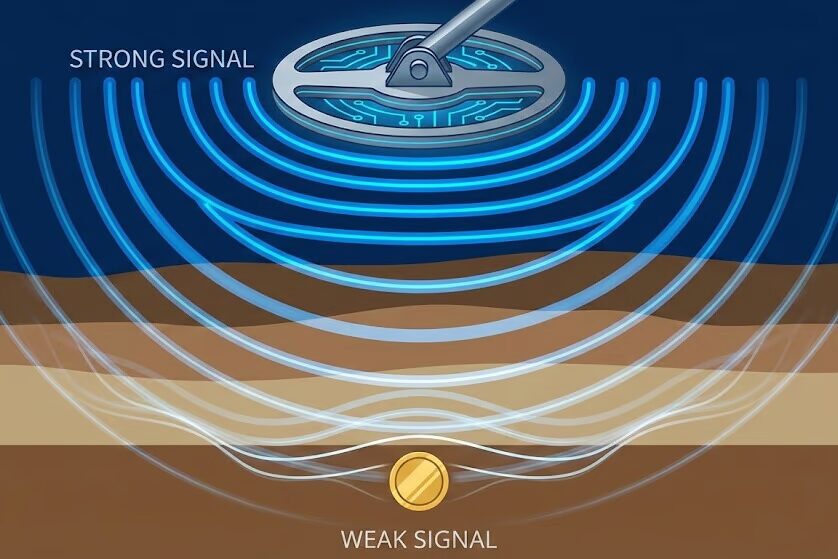
When I first researched the science behind detection depth, it actually shocked me. Electromagnetic signals don’t just gradually weaken as they go deeper into the ground. They collapse dramatically.
Here’s what happens: The magnetic field your coil transmits weakens as it travels through soil. Scientists call this an inverse cubic relationship, which sounds fancy but basically means the signal gets weaker fast. But here’s where it gets brutal. When that already-weakened field finally hits a deep target and creates a response, that return signal has to travel back through the same decay pattern.
The math works out to your detector receiving about 1/64th of the signal strength when depth doubles. So that quarter producing a screaming, clear signal at 6 inches? It becomes barely a whisper at 12 inches—if you can hear it at all.
And we haven’t even talked about what soil does to complicate things.
Ground mineralization affects detection depth more than most people realize. Iron oxides, magnetite, and conductive salts in the soil create their own electromagnetic responses. These ground signals can easily overwhelm the faint response from a deep coin. In heavily mineralized red clay or volcanic soil, you can expect 40-60% less depth than what the manufacturer advertises. Understanding your local soil conditions makes a huge difference in improving your detector’s depth.
Metal Detector Depth Range Factors: What Those “Maximum Depth” Claims Actually Mean
When I bought my first detector, the box proudly claimed 12-inch depth on coins. My reality? I struggled to consistently hit 7 inches. At first, I thought my machine was defective. Then I learned how manufacturers actually measure depth.
Most companies use something called air tests. They suspend targets in completely metal-free space—no ground interference, no mineralization, just perfect conditions that don’t exist anywhere in real hunting. The International Mine Action Standards (originally developed for humanitarian demining work) specify testing in sterile environments with no metal within 2 meters of the detector.
Real-world performance typically runs 20-50% lower than advertised specs. That “12-inch maximum depth” becomes 6-8 inches in typical soil. Hit heavily mineralized ground, and you might only reach 5-6 inches on a good day.
Experienced treasure hunters will all tell you the same thing: any coin you recover deeper than 6 inches represents a genuinely impressive find in actual field conditions.
Here’s what you can realistically expect for metal detector depth by class:
- Entry-level VLF detectors: 4-8 inches on coins
- Mid-range units: 8-12 inches
- Premium multi-frequency machines: 10-14 inches
- Pulse induction systems like the Garrett Axiom and Minelab GPX 6000: 12-18+ inches
But here’s what matters way more than equipment specifications: proper technique can add 2-4 inches to whatever machine you’re currently running. I’ve watched detectorists who’ve mastered ground balancing with $400 detectors consistently find deeper targets than folks with $2,000 machines who don’t understand their settings. Budget-conscious options like the Fisher F75 LTD with Boost Mode can achieve really impressive depth when you configure them properly.
Ground Balancing for Maximum Depth: The Foundation Everything Else Builds On
I spent my first six months detecting before anyone properly explained ground balancing to me. That’s six months of walking past deep targets because my detector was too busy fighting soil minerals to hear faint signals from buried coins.
The problem works like this: ground signal from mineralized soil can be literally hundreds of times stronger than the return signal from a deep coin. Your detector has to somehow subtract this massive ground response while still preserving that tiny whisper from 10 inches down. Proper ground balance settings provide the foundation for detecting targets at maximum depth.
Manual Ground Balancing: Best Settings for Deep Metal Detecting
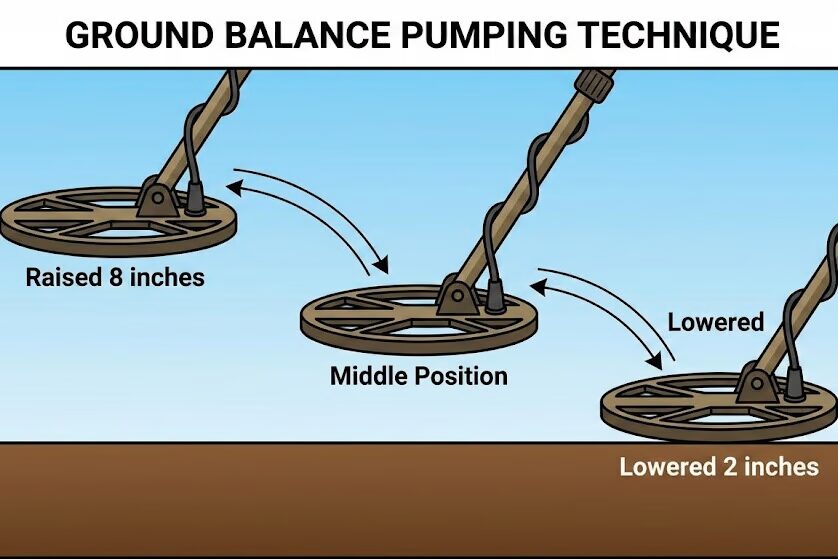
Manual ground balancing offers maximum depth potential, but it requires some practice to get right. Find a spot you’re confident is target-free. Switch your detector to All-Metal mode. Now comes the pumping motion—raise your coil 6-8 inches above the ground, lower it to 1-2 inches, then raise it again. Listen carefully to what your detector does.
If you hear the threshold hum get louder as you lower the coil, your ground balance runs too negative. If the hum gets quieter, it’s too positive. Keep adjusting your ground balance control while pumping until you achieve complete silence—no audio change during the entire pumping motion. That’s your sweet spot for maximum depth.
My first attempts at this were honestly pretty frustrating and confusing. Now? I can nail it in under a minute, and the difference in depth is dramatic.
Automatic Ground Balancing: Quick Metal Detector Ground Balance Settings
Most modern detectors offer automatic ground balancing, and it works brilliantly for most hunting conditions. You just press a button while pumping your coil, and the processor calculates optimal settings for you. For most hunters in most soil conditions, this provides results that come really close to what experienced users achieve manually.
Tracking Ground Balance: Adapting to Soil Conditions and Detection Depth
Tracking mode continuously adjusts your ground balance while you’re detecting. It adapts to changing soil conditions as you sweep. This feature is absolutely incredible for saltwater beaches where mineralization can vary dramatically from one sweep to the next. It also works great in fields with patchy soil composition.
The downside? In stable ground, it sacrifices a tiny bit of depth. There’s also some risk of “tracking out” extremely faint signals from deep targets if you sweep too slowly. But for challenging environments, it’s often worth the trade-off.
Improving Metal Detector Detection Depth: The Advanced Ground Balance Offset Move
Once you’ve really mastered basic ground balancing, you can start experimenting with offset techniques. Running your ground balance slightly negative (lower than the actual ground phase reading) makes your detector “hotter.” You get increased sensitivity to deep targets, but you also get more ground noise.
Running it slightly positive provides quieter operation at the cost of some depth. These effects vary wildly by location—what works perfectly in my local park completely fails in the iron-rich soil just twenty miles away. Metal detecting forums have tons of great discussions about optimal settings for specific soil conditions.
For highly mineralized ground, several strategies can help: switching to DD coils (which see about 70% less ground interference compared to concentric coils), lowering your sensitivity to reduce false signals (which can actually improve real detection depth by cutting noise), or considering multi-frequency technology specifically designed for challenging conditions.
Detector Frequency for Deep Detection: Why Low Frequency Metal Detectors Go Deeper
When Marcus first started explaining detector frequencies to me, I’ll admit I initially zoned out. “Just tell me what setting to use,” I said. Then he showed me the actual difference in real time on his machine, and I instantly became a believer.
Lower operating frequencies penetrate deeper into soil because longer electromagnetic wavelengths can travel farther before they dissipate. For large, highly conductive targets like silver coins, copper relics, and brass items, frequencies below 6-8 kHz provide your best penetration. This is why dedicated relic hunters often prefer lower frequencies—they’re specifically chasing big targets at serious depth.
The general-purpose sweet spot for coin hunting sits somewhere between 5-15 kHz. This range balances good depth capability with reasonable sensitivity to smaller targets. Push above 20-30 kHz, and you’re prioritizing sensitivity to low-conductivity targets like tiny gold nuggets. You’ll sacrifice several inches of depth on coins.
Multi-frequency detectors run multiple frequencies at the same time, trying to get the best of both worlds. Technologies like Minelab’s FBS and SMF systems, along with XP’s multi-frequency implementation, provide excellent target identification while maintaining really good depth. You’ll pay premium prices for this capability, but if you hunt varied targets in different conditions, the versatility often justifies the cost.
The Nokta Legend and Minelab Equinox 900 represent modern multi-frequency designs that seriously punch above their price points. They offer depth comparable to machines costing literally twice as much.
Search Coils and Coil Size for Depth: Large Coil vs Small Coil Depth Comparison
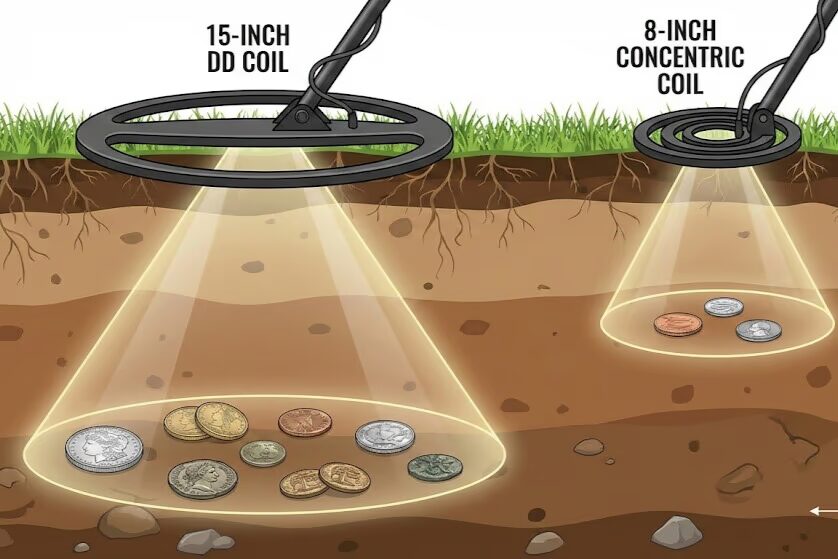
My first coil upgrade was a massive 15-inch DD coil. I was thinking “bigger automatically equals deeper” for treasure hunting. And I was right—sort of. In wide-open fields with isolated targets, that monster coil added a solid 2-3 inches of depth on large targets.
But in trashy sites? It became a total liability. It kept averaging multiple targets together into these garbled, unidentifiable signals I couldn’t interpret at all.
Here’s the basic rule of thumb: coil diameter roughly equals your maximum coin detection depth. A 12-inch coil will realistically detect quarters around 12 inches deep in favorable conditions. But that’s definitely not the whole story.
DD coils offer superior ground balancing capabilities in mineralized soil. They’re absolutely essential for increasing depth in challenging ground conditions.
Concentric coils provide better target pinpointing in mild soil, but they really struggle when ground mineralization gets high.
The large coil versus small coil depth trade-off: Large coils (12-15 inches) maximize your depth on isolated targets in open areas. Small coils (5-8 inches) provide excellent target separation and can actually help you find more total deep targets in iron-contaminated sites. Sometimes that separation capability matters more than raw depth.
Many experienced detectorists own multiple coils these days. They use large coils for open fields and parks, then switch to small “sniper” coils when they’re working sites that have been heavily hunted or have lots of iron trash.
Field Techniques for Detecting Targets at Maximum Depth
Your equipment definitely matters, but your actual technique determines whether you’ll actually hear those deep targets or not.
Coil Height: Maximizing Metal Detector Depth Penetration
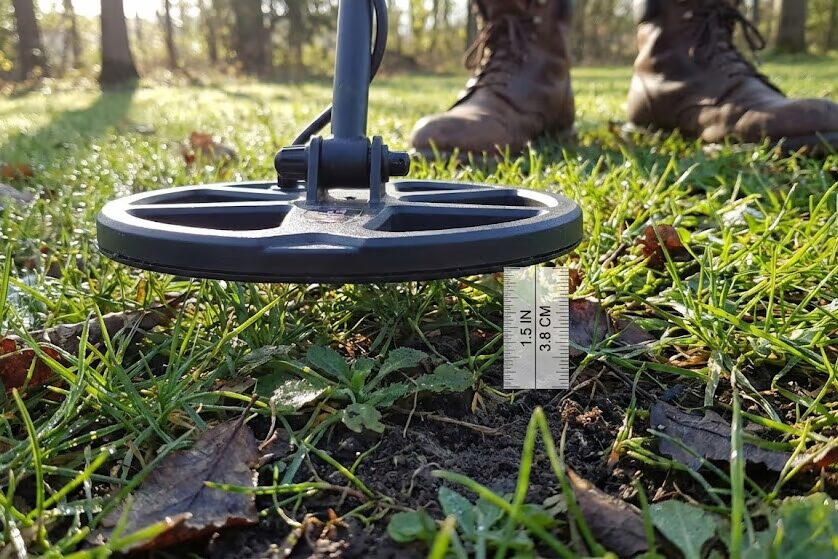
Keep your coil 1-2 inches from the ground maximum. I see so many hunters gradually creep up to 3-4 inches without even realizing they’re doing it. You’re sacrificing depth immediately when this happens. That single inch of extra height matters way more than you’d think.
Sweep Speed: Essential Deep Target Recovery Techniques
Your sweep needs to be noticeably slower than what feels natural. Deep targets require more processing time for your detector to register them properly. I literally count “one-Mississippi, two-Mississippi” for each sweep, and I overlap each pass by about 50% to make sure I’m not leaving gaps.
Metal Detector Sensitivity Settings and Discrimination for Maximum Target Depth
This creates a really critical trade-off you need to understand. Running minimal discrimination means you’ll dig more trash, no question. But those deep, unstable signals often get completely filtered out by aggressive discrimination settings.
The absolute deepest finds frequently come from borderline signals that could honestly be either iron trash or silver treasure. You genuinely won’t know until you dig. Learning to trust these faint, questionable signals separates casual hunters from folks who consistently recover deep finds.
Deep Target Signal Identification: What to Actually Listen For
Shallow targets basically scream at you. They produce loud, sharp audio with really defined start and end points. The target ID locks on solid and stays there.
Deep targets whisper.
A genuinely deep target generates a quiet, soft, sometimes “muffled” tone that might cut in and out across multiple sweeps. The target ID jumps all over the place—maybe showing “penny” on one sweep, “dime” on the next sweep, then “zinc” after that. This instability drives beginners absolutely crazy, but it’s completely normal for deep finds.
Here’s my verification technique: I approach suspected deep targets from 90-degree perpendicular directions. True targets will produce consistent signals (though weak) from all angles. Hot rocks and false signals typically null out or completely disappear when you change your sweep direction. The Dankowski Forum has some excellent technical discussions about signal interpretation if you want to dive deeper into this topic.
Site Selection for Detecting Deep Relics and Artifacts: Research Beats Equipment Every Time

I dropped $800 on my second detector, genuinely thinking better gear would solve all my problems. Then I met Sarah at a local club meeting. She was absolutely crushing it with a $350 machine because she researched her hunting sites obsessively.
The deepest targets are always old targets. For coin hunting, that means focusing on pre-1965 sites in the United States (when silver coins left general circulation). Historical research becomes absolutely crucial.
I use historic plat maps, USGS topographic maps from the late 1800s, Sanborn fire insurance maps, and historic aerial photos to reveal former homesites and gathering places. These locations often don’t exist anymore on modern maps, but they can contain concentrated losses now buried beneath literally decades of accumulated soil.
My absolute best deep silver finds came from sites I discovered through old library records and historic maps. Other detectorists had no clue these places even existed because the actual structures had disappeared 50+ years ago. This kind of research honestly matters more than owning the most expensive detector on the market.
Soil Conditions and Detection Depth: Tips for Finding Deep Buried Treasure
Understanding your local soil conditions helps you time your hunts for maximum success. In areas with low mineralization, detecting about 1-2 days after good rainfall (when soil stays damp but not saturated) provides noticeably improved conductivity and enhanced depth. The moisture actually helps electromagnetic fields penetrate deeper—it’s a simple but effective technique for improving detection depth.
However—and this genuinely surprised me when I first learned it—in heavily mineralized iron-rich soils, wet conditions can actually make detection worse. The moisture connects iron oxide particles together into what essentially functions as “one gigantic iron target.” For these specific sites, dry conditions often work better.
You’ll need to test and learn what works in your specific local soil conditions through trial and error.
Increasing Metal Detector Depth: Common Questions About Deep Target Detection
The most common culprits affecting your depth range: improper ground balancing (your detector’s fighting mineralization instead of detecting targets), excessive discrimination that filters weak signals, holding your coil too high off the ground (3+ inches), sweeping too fast for proper signal processing, insufficient overlap between passes, or batteries running low and reducing processing power.
Start troubleshooting systematically. Verify your ground balance settings are correct. Run minimal discrimination. Maintain that 1-2 inch coil height. Slow your sweep speed way down. Ensure you’re overlapping by 50%. Check your battery voltage. One of these factors is almost certainly the culprit.
Generally yes in mild soil—damp conditions about 1-2 days after good rainfall typically help significantly. But heavily mineralized iron-rich soil can honestly detect better when it’s dry. The universal answer doesn’t exist here. You need to test and understand the soil conditions in your specific hunting areas.
Large coils (12-15 inches) definitely provide greater maximum depth on isolated targets in open ground. But small coils (5-8 inches) often help you recover more total deep targets in trashy sites. Why? Because they can separate closely spaced objects that large coils just average together into unidentifiable mush.
The context of where you’re hunting determines the right choice. Most serious hunters eventually own both and switch based on site conditions.
For large silver coins, frequencies below 8 kHz provide your best penetration and deepest detection. For general coin hunting that mixes various denominations, the 8-15 kHz range works really well.
Multi-frequency machines like the Equinox 900, XP Deus II, or Nokta Legend optimize performance across the entire spectrum simultaneously. They often represent the best overall choice for varied hunting conditions, though they do cost more.
In favorable low-mineralization soil, with premium equipment, and using perfect technique—yes, 12-14 inches is genuinely achievable on large silver coins. But here’s the reality check: experienced treasure hunters universally acknowledge that any coin recovered deeper than 6 inches represents a legitimately impressive find in typical field conditions.
Anything you pull from past 10 inches is truly exceptional and demonstrates real mastery of the hobby. When you see people posting 15-inch coin finds on forums, they’re usually hunting in uniquely favorable conditions with really loose, mineralization-free soil. Or they’re recovering unusually large targets like silver dollars or small caches rather than regular quarters and dimes.
Best Settings for Deep Metal Detecting: The Bottom Line on Deep Target Detection
I’ve spent three years seriously chasing depth, constantly testing settings, comparing different coils, and obsessively researching new sites. Here’s what I’ve learned that actually matters in real hunting conditions.
Ground balancing provides the absolute foundation that everything else depends on. Master your ground balance settings before you start obsessing over coil choices or frequency specifications. I genuinely cannot stress this enough. A properly ground-balanced $400 detector will consistently find deeper targets than a poorly configured $2,000 machine every single time.
Lower frequencies penetrate deeper for large conductive targets. If you’re specifically hunting deep silver coins and relics, frequencies below 8 kHz provide a real edge. But for general hunting with varied target types, multi-frequency technology offers the best overall compromise between depth capability and target identification accuracy.
Larger DD coils maximize your raw depth in open ground, but proper technique still beats equipment specs. That fancy 15-inch coil doesn’t help you at all if you’re sweeping too fast, holding it too high off the ground, or running excessive discrimination that filters those faint deep signals.
The absolute deepest finds come from sites that other hunters don’t know about. Your research capabilities matter just as much as your detector capabilities. That old homesite you discovered in historic records but doesn’t exist on any modern map? That’s exactly where the deep silver lives.
And here’s the truth about treasure hunting that honestly took me two full years to accept: the deepest targets are whispers, never screams. They present themselves as borderline, unstable signals that could genuinely be either trash or treasure. The disciplined detectorists who methodically investigate every repeatable signal—even the weak, questionable ones—consistently recover the finds that literally everyone else walks right over.
The inverse sixth power relationship governing electromagnetic signal decay absolutely cannot be beaten. It’s fundamental physics. But within those physical constraints, proper technique, carefully optimized settings, and strategic site selection let you consistently detect targets that less thorough hunters completely miss.
The deepest silver is definitely out there, buried beneath decades of accumulated soil, just waiting for someone skilled enough and patient enough to hear its whisper.
Now get out there and find it.

My name is Paul and I am the founder of Detector For Metal, a dedicated resource for metal detecting enthusiasts seeking to uncover historical treasures and connect with the past using the latest technology. As a stay-at-home dad and family man, I’ve found metal detecting to be the perfect hobby that combines family adventure with historical learnings for the whole family.
As a father, I’m deeply committed to passing on this hobby to the next generation of detectorists, starting with my own children. I share advice on everything from metal detecting with kids to exploring the top 10 metal detecting sites you never thought about. My methodical approach to the hobby goes beyond the thrill of discovery—it’s about creating family traditions while preserving history and sharing the stories of those who came before us.