Table of Contents
You’ve just spent six hours driving to a beach town. The kids are bouncing off the hotel room walls. You pull out the gear—but nobody packed a digging tool. Cue the meltdown.
I’ve been there. My wife still reminds me of the time I forgot snacks and we were done in twenty minutes. Vacations with kids can be exhausting without a structured plan, and metal detecting is no exception. Done right, though, it turns a trip from “what do we do now?” into “can we stay another hour?” Done wrong, it’s a sandbox full of frustration.
Here’s the promise: this guide will help you turn your next family vacation into a genuine shared adventure—one where everyone stays engaged, the whining is minimal, and you go home with stories (and maybe a few wheat pennies) instead of regrets. We’ll cover the 50/50 rule for balancing detecting with other activities, how to vet destinations for kid-friendly spots, permission templates so you don’t get turned away, and age‑appropriate games that turn signals into squeals.
Because metal detecting isn’t just a solo obsession. As Detector Power puts it, it’s a bonding experience that bridges solo hobbyists and family adventurers. And Garrett Direct reminds us that the hobby fosters curiosity, patience, and a connection to history—all things I want my kids to absorb without realizing they’re learning. So before you plan your next trip, take my word for it: leave room in the trunk for a detector.
How Metal Detecting Enhances Your Family Vacation

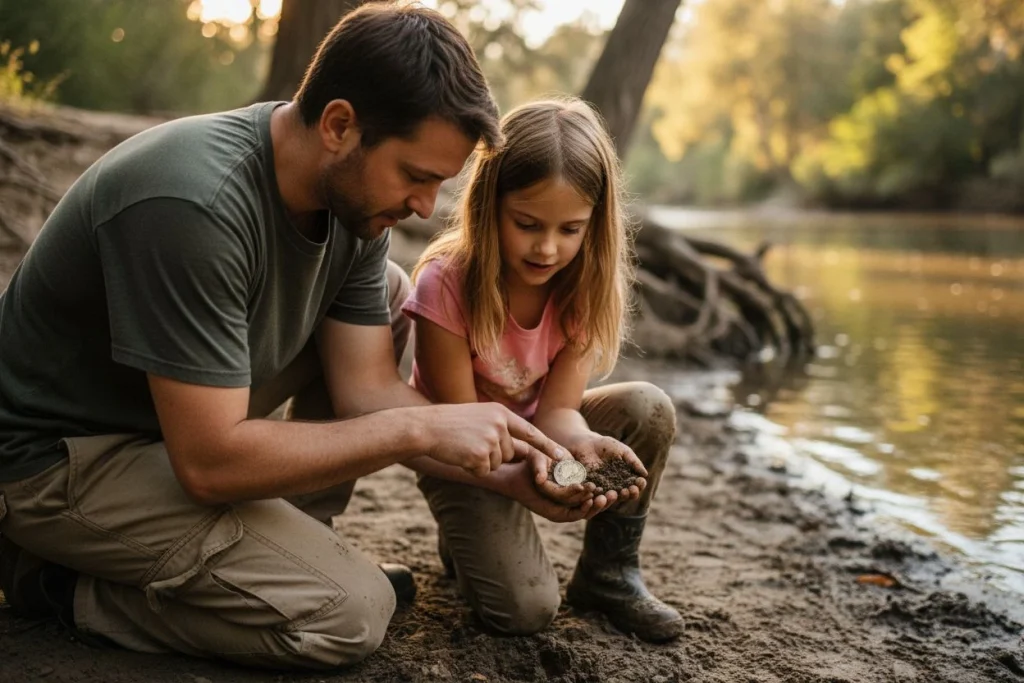
The first time my oldest daughter dug up a 1943 wheat penny at a crowded campground, she screamed like it was pure gold. I’m not exaggerating — she clutched that little brown coin, flecks of dirt still clinging to her fingers, and ran straight to my wife, shouting “I found treasure!” Something clicked for me in that moment. Yes, she’d found about five cents worth of copper. But what she’d really found was a connection — to the past, to the dirt under her feet, and to the idea that the world is full of hidden stories waiting to be uncovered. I knew right then this hobby could travel with us.
That’s the core of why metal detecting works so well for family trips: it shifts the goal from “what’s this worth?” to “what’s this story?” Serious Detecting calls it a “mindset of discovery,” and they’re spot-on. When you frame every dig as a mystery instead of a dollar value, kids stay engaged even when the finds are just rusty bottle caps. They’re hunting history, not gold.
Of course, you can’t just hand a kid a detector at a new destination and expect magic. Detector Warehouse recommends practicing in your own backyard first — let them learn how to swing, how to dig a clean plug, how to fill holes properly. We spent a few Saturday afternoons in our side yard before we ever packed the gear for a trip. By the time we hit that campground, she knew what a solid signal sounded like and how to use her little trowel. Confidence made all the difference.
Plus, detecting stealth-teaches science. Every time my daughter asks why a coin beeps differently in wet sand versus dry dirt, I explain the halo effect — how minerals gather around buried metal over time, altering the signal. It’s chemistry and geology we’re covering without a single textbook. I’ve written more about that at this article on the halo effect. If you’re looking for a beach-specific family setup, I’ve covered that too in my beach detecting with kids guide.
The trick is to plan for the mindset, not just the equipment. When you do, detecting becomes something the whole family pulls for — not just Dad’s solo obsession.
Use the 50/50 Rule to Keep Kids Engaged While Detecting
The 50/50 rule is simple: spend the morning detecting when kids are fresh and curious, then pivot to other activities in the afternoon before anyone melts down. Split the day, keep everyone engaged, and nobody ends up crying in a sandbox.
I learned this the hard way on a trip to the Oregon coast. My oldest was six, and I’d planned a full day of beach detecting. She lasted ninety minutes. By hour two, she was sitting in the wet sand, arms crossed, asking when we could get ice cream. I kept swinging, thinking I could squeeze out one more good signal. My wife finally walked over, knelt beside our daughter, and said: “If we detected for four straight hours, even I get cranky. She’s not wrong.”

That’s when I started structuring our detecting days like a real itinerary.
Here’s how it breaks down: detecting from 8:00 AM to noon, when the kids have energy and the ground is cool. Then lunch, followed by a completely different activity — a museum, a swimming hole, a playground, whatever fits the destination. The morning catches the novelty window. The afternoon keeps the trip from feeling like a chore.
Run Wild My Child nails it: keep trips short and exciting. Kids burn out fast when every swing is a maybe-find. And Garrett Direct recommends turning the hunt into a game — I’ve found that a simple scavenger hunt checklist (find a penny, a pull-tab, a bottle cap) extends attention spans by about forty-five minutes.
The 50/50 rule also gives you space to scout for the next morning’s hunt. I use aerial photos to find hidden detecting spots while the kids are swimming. And if we’re near a beach, I save the wet sand for that first window — sand reading is easier in the morning light, and beach hunting strategies work best when kids can see what you’re doing.
Next time you book a trip, try the 50/50 rule. I share a free printable daily schedule template in our Resource Library.
How to Find Family-Friendly Detecting Destinations
Not every “looks good on Google Maps” spot is legal to detect. Before you load the minivan, you need to confirm land status, ask the right questions, and know which public lands are open—and which will land you a fine under ARPA.
I learned this the hard way. Three hours from home, we rolled into a state park that looked perfect: old picnic grounds, a creek running through it, history dating to the 1880s. My daughter had her little trowel ready. Twenty minutes later, a ranger kindly explained that this particular park had a blanket ban on detecting. We spent the afternoon at a dusty playground instead, and I spent the drive home memorizing the lesson: vet before you go.
Now I call the local ranger station or land management office first, and here’s exactly what I say:
“Hi, I’m planning a family metal-detecting trip and wanted to confirm your policy on hobby detecting—are there any areas where it’s allowed, and do I need a permit?”
Simple, polite, direct. Most staff appreciate the courtesy and will point you to the right map or PDF. Here’s what the law says:
- National Parks, Monuments, and Historic Sites – strictly off-limits. No detecting. Zero exceptions. The Antiquities Act and ARPA can hit violators with hefty fines (think thousands of dollars).
- BLM land and National Forests – generally OK for hobby detecting, as long as you don’t disturb archaeological or historical artifacts.
- State parks – a total crapshoot. Some ban it outright; others (like Maryland or Virginia) offer permits for designated zones. Never assume.
So before you book, run this quick checklist:
- Check the land manager’s website – look for a “metal detecting” policy page.
- Call or email the local office – use the script above. Ask about seasonal closures or sensitive areas.
- Use interactive maps – the BLM’s web map layers land status; also try county GIS portals.
- Join a local detecting club on Facebook – locals know which spots are active, which are blown out, and which rangers are detector-friendly.
I also spend an evening with Sanborn maps and aerial photos to find old structures or forgotten picnic groves before I call. That way I can say, “I’m particularly interested in the area near the old schoolhouse on the 1928 map—any restrictions there?” That kind of specificity gets you a better answer than “can I detect somewhere?”
And if you want to go really deep, library research can uncover newspaper articles about old county fairs or park dedications—places where kids dropped coins decades ago. But none of that matters if you show up and get shut down. Vet first, dig second. Your family will thank you.
Treasure Hunts That Excite 8-Year-Old Detectorists
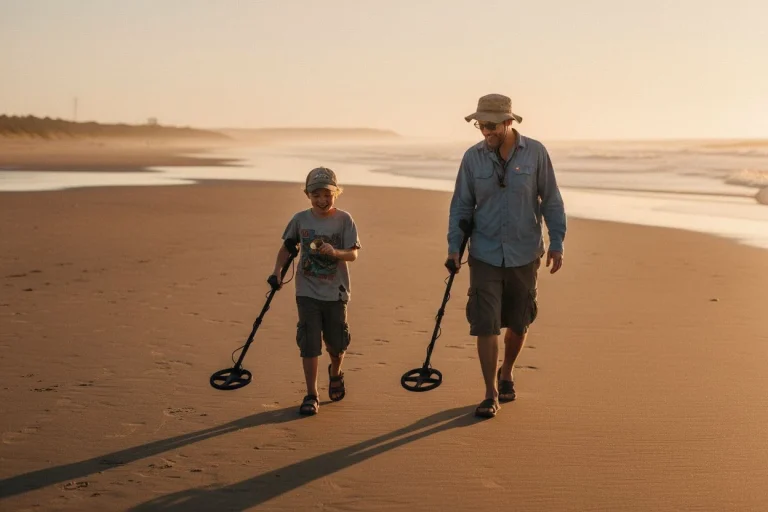
The trick with kids this age isn’t teaching them to ground balance—it’s keeping the hunt novel enough that they don’t wander off after fifteen minutes. Assign clear roles (operator, digger, cataloger), rotate them every thirty minutes, and build in a low-stakes scavenger hunt checklist. That’s how you turn a detecting outing into something that feels more like a game than a chore.
My youngest loves being the “digger” but only if she gets to wear the gloves—the thick leather ones that make her feel like a paleontologist. The oldest is the “cataloger” and carries a small notebook where she sketches each find and jots down what it looked like before we cleaned it. We rotate every half-hour so nobody gets bored with their job. That rotation, borrowed from a recommendation by Detector Power, keeps everyone engaged because the novelty resets.
A scavenger hunt checklist, suggested by Garrett Direct, turns the whole morning into a game: “Find a pull-tab, a coin, and a bottle cap.” First one to complete all three wins picking the lunch spot. My kids race to dig the cruddiest targets—they’ve gotten surprisingly good at spotting zinc pennies from the sound alone.
I also have each child keep a “treasure log,” a simple composition book where they record the date, location, and what they found. They draw a quick sketch or tape the item to the page if it’s flat. Run Wild My Child recommends this approach, and it works because the act of logging turns a collection of junk into a real journal of discovery. To make it educational, I’ll point to our Metal Detector Target Identification Guide so they can look up their target ID numbers and guess what’s underground before we dig. And when they find a worn-out coin with no readable date, we pull up the Secret Tricks for Dating Worn-Out Coins and turn it into a mini history lesson right there in the field.
Download my free printable “Family Treasure Hunt” cards – 3 levels for ages 5–7, 8–10, and 11+. (link to future resource)
Packing for Family Metal Detecting and Airport Security
The TSA agent at Sacramento International picked up my Minelab Equinox case, gave it a puzzled squint, and asked, “Is this a bomb?” I laughed nervously—a little too loudly—and fumbled for the manual buried in my carry-on. Now I travel with a printed TSA policy sheet and a calm explanation ready: “It’s a metal detector for family treasure hunts.” They always wave me through. Packing for a family metal detecting trip requires more than throwing gear in the trunk, especially when flights are involved.
Family Metal Detecting Trip Checklist
Detector and accessories. Choose a lightweight kids’ model—Garrett Direct recommends one under 3 pounds with an adjustable stem and waterproof coil for beach trips. I pack the adult detector in my carry-on (checked bags get tossed around), and lithium batteries always stay with me per FAA rules. Bring the detector manual or a printed TSA info page—it saves headaches at security.
Digging tools and gear. A small digging tool, gloves, and a finds pouch are non-negotiable. Detector Warehouse suggests this basic kit for young treasure hunters. If you’re planning beach or wading hunts, review our Underwater Metal Detecting: Essential Wading Safety and Gear Guide before packing.
Comfort and logistics. Snacks, water bottles, sunscreen, and extra layers—kids get hungry, tired, and cranky fast on a detecting trip. I also bring a dedicated “treasure bag” (a sturdy canvas tote) where each child keeps their finds separate. It prevents arguments over who found what, and it keeps sand-covered coins from ending up in the bottom of my wife’s beach bag.
The printed backup. Beyond TSA info, I carry a one-page summary of local detecting laws for our destination. It’s saved me twice—once at a state park where the ranger admitted he wasn’t sure about the rules, and my printout settled it. A little pre-trip paperwork keeps family metal detecting trips running smoothly, from baggage claim to the first target hit.
How to Politely Ask Authorities for Detecting Permission

My buddy Mike never asks permission. He just shows up, swings his coil, and hopes nobody notices. I’ll never forget the time I watched him get politely but firmly escorted off a state beach near Santa Cruz—he’d driven two hours for a ten-minute hunt. Meanwhile, I’ve asked for permission hundreds of times and never been turned down when I lead with two things: my kids are with me, and we fill every hole.
The secret is a simple script that any parent can use. “Hi, I’m a parent planning a family trip to [location]. We’re hobby metal detectorists and would love to detect in [specific area]. Can you tell me the rules? We’re happy to provide an ID and will leave no trace.” That’s it. No legal jargon, no defensiveness, no “I’m just checking for lost jewelry.” Just honesty and a clear willingness to follow their rules.
Before you call, do your homework. Subterrix’s state-by-state guide makes clear that ignorance of the law is not a defense—and that contacting local ranger districts directly is the only reliable way to know what’s allowed on state parks, BLM land, or National Forests. I call at least two weeks before a trip, ask for the specific person who handles permits, and take notes. If they say yes, I ask for it in writing. Run Wild My Child emphasizes that written permission and a mutual agreement on how to handle valuable finds (e.g., “anything worth over $100 gets split 50/50 with the landowner”) prevents awkward conversations later.
I also carry a one-page printed summary of every permission I’ve obtained, plus copies of relevant state laws. It’s saved me twice: once at a county park where the front-desk staff contradicted their own posted rules, and again at a historic beach where the ranger admitted he wasn’t sure of the policy and let me hunt for the day anyway. For documenting permissions and finds responsibly, I use the approach from our guide on legal documentation and the curator’s recording method.
Download my printable Permission Scripts – three ready-to-use templates for parks, beaches, and private landowners, plus a blank customizable version.
Top Destinations for Family Metal Detecting Vacations
The best spots for family detecting trips are places where the ground has seen lots of foot traffic, the trash‑to‑treasure ratio is forgiving, and the environment is safe for little fingers. Think public parks, beaches, campgrounds, schoolyards (with permission), and picnic areas. Avoid archaeologically sensitive sites or places where you might dig up something that could frustrate a young hunter.
- Local parks and picnic areas – The classic starter zone. Kids can swing alongside playground equipment (stay back from the actual jungle gym for safety) and grassy fields. Garrett Direct recommends checking schoolyards too, once you’ve cleared it with the office. I use the Minelab Vanquish 540 in these low‑trash settings and let my daughter run a Garrett ACE on low sensitivity. For more park‑specific tips, see Unlock Park Treasures: Essential Minelab Vanquish 540 Tips.
- Beaches – Soft sand, easy digging, high odds of lost coins and cheap jewelry. Detector Warehouse notes that beaches are perfect for beginners because you can practice filling holes without tearing up grass. I’ve pulled pull‑tabs, bottle caps, and the occasional silver earring from the wet sand with my kids. For a deeper dive, check out Secrets to Metal Detecting on the Beach in California.
- Campgrounds – Stay near fire pits and picnic tables where families drop keys, coins, and toy parts. Pack a small sieve and let your kids sift through the ash pits (cold, please). I’ve found more smashed pennies and matchbox cars here than anywhere else.
- Tot lots with rubberized surfaces and sand areas – These are goldmines for modern clad and plastic toys. The rubber surface is easy to dig in, and the sand sections hold coins that slip out of pockets. My buddy Tom’s kids love old drag strips because they always find bottle caps and spark plugs—they treat them like trophies. Treat any new location the same way: start with a “treasure hunt” mentality, not a monetary one.
- Historical fairgrounds – With permission from the local fair board, the grassy overflow parking and livestock pavilion areas often hold decades of lost coins and tokens. Always call ahead and explain you’re bringing kids; fair managers are usually happy to say yes if you promise to fill every hole.
One critical warning: avoid any area marked “sensitive habitat” or “protected archaeological zone.” National Parks, Native American burial sites, and Civil War battlefields are off‑limits. Stick to the spots where a kid’s excited yelp over a rusty bottle cap is the best sound you’ll hear all day.
Transform Your Family Vacation into a Detecting Adventure
The difference between a trip that drains you and one that fills the family album is planning. Swap the generic beach vacation for a deliberate treasure expedition. The 50/50 rule, a researched destination, and a simple permission script turn chaos into curiosity.
You don’t need a $1,200 detector to make memories – you need a library card and a Saturday afternoon with Google Earth. That’s the real investment. Your Ultimate Metal Detecting Weapon Is Researching… in a Library – it’s the most powerful tool you’ll pack.
Plan your first family detecting trip this summer. Start with the 50/50 rule and one of the destinations above. And if you run into trouble – email me. I’ll help you research the spot.
And if you’re stuck for ideas, join a local detecting club. The community will point you to spots no blog post can cover.
My wife and kids still talk about the trip to that beach in Oregon where we found a 1940s token. It wasn’t valuable. But we spent the whole afternoon building a story around it. That’s the real treasure.

My name is Paul and I am the founder of Detector For Metal, a dedicated resource for metal detecting enthusiasts seeking to uncover historical treasures and connect with the past using the latest technology. As a stay-at-home dad and family man, I’ve found metal detecting to be the perfect hobby that combines family adventure with historical learnings for the whole family.
As a father, I’m deeply committed to passing on this hobby to the next generation of detectorists, starting with my own children. I share advice on everything from metal detecting with kids to exploring the top 10 metal detecting sites you never thought about. My methodical approach to the hobby goes beyond the thrill of discovery—it’s about creating family traditions while preserving history and sharing the stories of those who came before us.